SearchStax Managed Search service clients sometimes ask us how to use the Solr Schema API with Managed Search deployments. On this page we have collected some practical examples.
Note that SearchStax personnel cannot advise on how to modify or troubleshoot your Solr schemas. That is beyond the scope of our support agreements, although you can purchase a limited number of Solr Advisory hours.
Add Single Field from Linux
The Solr Schema API reference page (linked above) contains many examples of how to use API methods in the context of Linux and cURL. We have adapted some of them here to show how they look with Managed Search.
The collection is called films. It contains many fields related to movies.
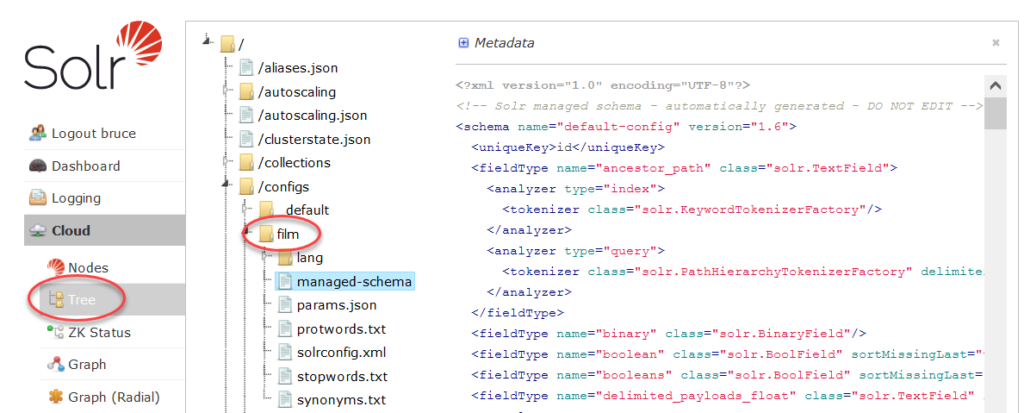
To view a collection’s schema, open the deployment in the Managed Search dashboard and click on the Http Solr Endpoint. This opens the Solr Dashboard. Navigate to Cloud > Tree > Configs > ConfigName > managed-schema. The text of the schema file opens on the right. You cannot edit it directly, but you can see changes appearing there.

We expect to insert some new fields into this file.
To add a new field to the schema, follow this example from the Bash prompt:
$ curl -X POST -H 'Content-type:application/json' --data-binary '{
  "add-field":{
     "name":"new_example_field",
     "type":"text_general",
     "stored":true }
}' https://ss1233456-xxxxxx-us-west-1-aws.searchstax.com/api/collections/films/schema
If you are successful, Solr will send you a response similar to:
{
  "responseHeader":{
    "status":0,
    "QTime":3756}}
Be sure to refresh your browser view of the Solr Dashboard. Look for the new field in alphabetical order, bearing in mind that fields beginning with capital letters all sort to the top of the list.

Remember to refresh the browser before looking for the added field.
Load File of Changes from Linux
Few people need to add only a single field. They prefer to upload a file of Schema API commands. We kept it simple by including only a single command in a text file to show the syntax. The file is updateschema.json containing this add-field command:
{
  "add-field":{
     "name":"new_field_from_file",
     "type":"text_general",
     "stored":true }
}
The cURL command to load this file is:
$ curl -X POST -H 'Content-type:application/json' --data-binary @updateschema.json \
https://ss123456-xxxxxx-us-west-1-aws.searchstax.com/api/collections/films/schema
The example presumes that you have navigated to the directory where the .json file resides. The “@” in front of the file name means the local directory. Otherwise there would have to be a full path leading to the file.
The new field has appeared in the schema:

Load File from Linux using Basic Auth
If your Solr deployment is protected by Solr Basic Auth, you’ll have to include a username and password in the deployment URL.
curl -X POST -H 'Content-type:application/json' --data-binary @updateschema.json \
https://user:password@ss123456-xxxxxx-us-west-1-aws.searchstax.com/api/collections/films/schema
The new schema field has appeared as expected.

Load File from Windows Powershell
From the Windows side, you can use the cURL commands above from Cygwin, or you can use PowerShell. We used PowerShell 6.2.
For the simplest example, we created a file called schemaapichanges.ps1 containing this script:
$SOLR = "https://ss123456-xxxxxx-us-west-1-aws.searchstax.com/api/collections/films/schema"

$content = [IO.File]::ReadAllText("C:\updateschema.json")

$RESULTS = & Invoke-RestMethod -Method Post -Body $content -ContentType 'application/json' `
           -uri "${SOLR}" | ConvertTo-Json

Write-Host $RESULTS
Run this script in a PowerShell command window from the directory where the data file resides. The expected new field appeared in the schema. You can see that we renamed the field:

Load File with PowerShell using Basic Auth
We have a Help Center page demonstrating how to include Solr Basic Auth credentials in a PowerShell script. The PowerShell script shown above requires a few more lines of code:
$SOLR = "https://ss139062-prz80ctj-us-west-1-aws.searchstax.com/api/collections/masscollection/schema"

# Using Solr basic auth credentials from PowerShell requires these steps:
$USER = "user"        #Solr Basic Auth username
$PASS = "password"    #Solr Basic Auth password

$SECPASS = ConvertTo-SecureString $PASS -AsPlainText -Force
$CRED = New-Object System.Management.Automation.PSCredential ($USER, $SECPASS)

$content = [IO.File]::ReadAllText("C:\updateschema.json")
$RESULTS = & Invoke-RestMethod -cred $CRED -uri "${SOLR}" -Method Post -Body $content `
           -ContentType 'application/json' | ConvertTo-Json

Write-Host $RESULTS
The new field appears as expected:

Error Messages
If you attempt these examples on a deployment that uses Solr Basic Auth, and you don’t provide the Basic Auth credentials, you’ll get a 401 error.
If you attempt to add the same field twice, you’ll see a 400 error.
Questions?
Do not hesitate to contact the SearchStax Support Desk.

