New Relic Integration
SearchStax helps companies host, deploy, and administer their Solr search solutions in the cloud. The SearchStax Managed Search service offers automated provisioning and scaling of Apache Solr Search Engines, backups, 24/7 monitoring and alerting, comprehensive analytics, and administrative tools.
New Relic Restricted Availability
New Relic integration is available to Platinum and Platinum Plus clients only. See the SearchStax Pricing page for the most up-to-date information.
New Relic integration is available for deployments on Amazon Web Services and Google Cloud Platform only. This feature is not offered for Azure deployments.
Subject to the above restrictions, New Relic integration includes these features:
- New Relic APM is a software-analytics service for application performance monitoring (APM). It provides both current and historical information about memory usage, CPU utilization, database query performance, web browser rendering performance, application availability and error analysis, external services, and other useful metrics.
- New Relic Servers allows you to view and analyze critical cloud server metrics, including CPU usage, physical memory, network activity, processes, and disk I/O utilization and capacity.
SearchStax Managed Search is easily integrated with these New Relic services, combining ease of cloud deployment with ease of application and system monitoring. This page shows you how to put it all together.
SearchStax Managed Search also integrates easily with PagerDuty.
Combining Managed Search and New Relic Services
New Relic monitoring is orthogonal to your Solr application. You don’t have to do anything in Solr to make it work.
New Relic and SearchStax Managed Search both can monitor Solr throughput, cache behavior and general server health. The monitoring tools in Managed Search complement those of New Relic, giving you insight at the network, server, and application level. See Managed Search monitoring for more information.
It is very easy to set up a New Relic and Solr integration. There are five steps:
- Create your SearchStax Managed Search deployment
- Subscribe to New Relic monitoring
- Connect Managed Search to New Relic
- Monitor your servers via the New Relic dashboard
Create Your Managed Search Deployment
Create a SearchStax Managed Search service deployment so that you have admin access to the SearchStax Managed Search dashboard. See our Quick Start page for helpful information.
Subscribe to New Relic Monitoring
Many SearchStax Managed Search users are already using New Relic services. If you are unfamiliar with New Relic, they offer a free 14-day trial. See the New Relic website for further information.
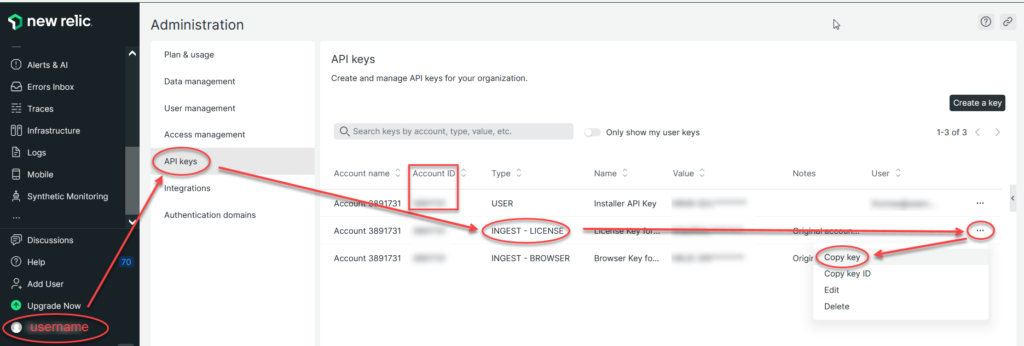
Look on the UserName (your name) tab of your New Relic user account for the API Keys screen. Here you can see the New Relic account number and the key values you will need for SearchStax Managed Search.

Connect Managed Search to New Relic
There are two paths to hook up New Relic services to your Managed Search deployments, depending on whether you want to apply New Relic to all of your deployments, or only to some of them..
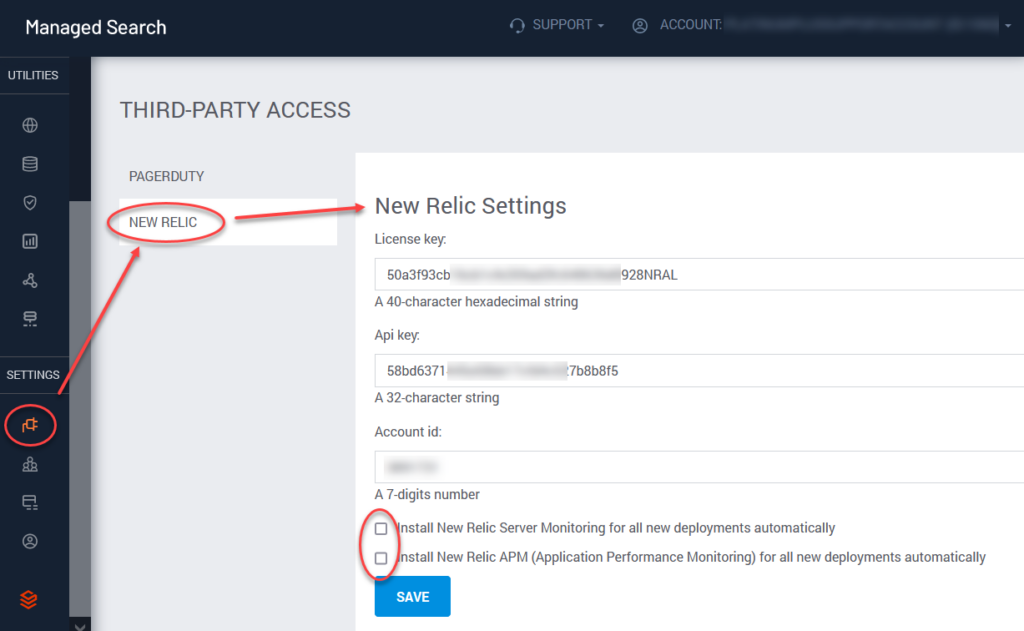
To set up Managed Search to use New Relic, open the Managed Search dashboard and navigate to Settings > Third-party access > New Relic. Enter the New Relic License Key, the API Key, and the Account Number.
The checkboxes let you install New Relic Server Monitoring and/or New Relic APM by default on all new servers in this account.

To apply New Relic to an individual deployment, navigate to the Deployment Details page. Click the New Relic button.

Check one or both New Relic services and click Save. Note that the APM service involves restarting all of your Solr applications. This takes a few minutes.

Note that you can remove New Relic monitoring from a deployment by returning to this dialog box and unchecking the boxes.
That’s all it takes to connect New Relic monitoring to SearchStax Managed Search.
Monitor Your Servers via the New Relic Dashboard
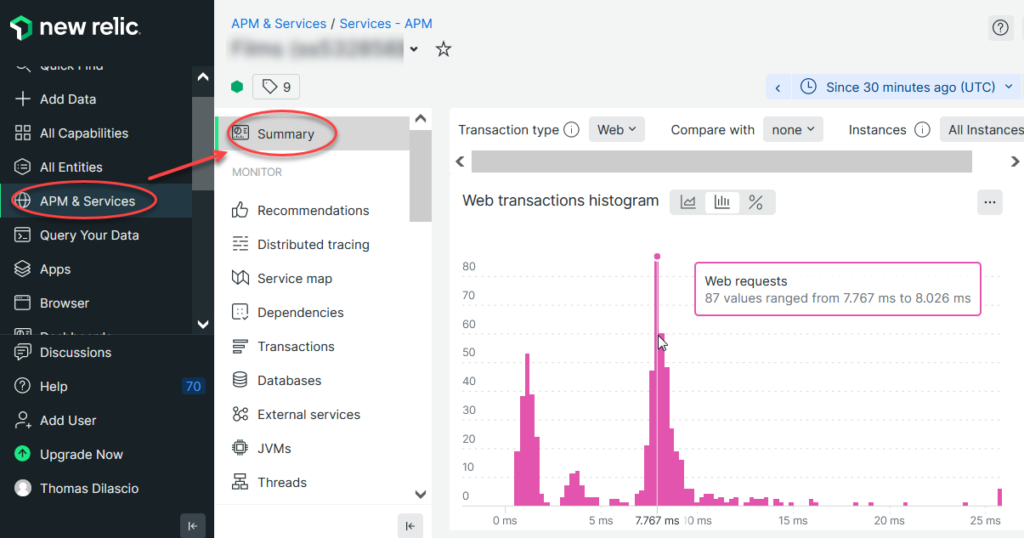
Return to the New Relic website and select the APM & Services tab from the navigation bar. Then open the Summary display. Monitoring data appears almost immediately.

Questions?
Do not hesitate to contact the SearchStax Support Desk.

