
How to Add Custom Indexes to Sitecore 9.1 to 10.0 using SearchStax Cloud
Overview
SearchStax Cloud can be used to add custom indexes on a Sitecore website.
This page presumes that you have already installed Sitecore and connected it to a SearchStax Cloud deployment according to the directions for Sitecore 9.1, Sitecore 9.2, Sitecore 9.3, or Sitecore 10.
Therefore, you already have a Sitecore site that is connected to a compatible SearchStax Cloud deployment. You have access to the Solr Dashboard, and you have prepared Solr configuration files for your custom collections, including a custom Managed Schema file.
Custom Indexes for Sitecore 10+
The SearchStax Cloud Connector makes it easy to create custom indexes for Sitecore 10+. The indexes can be configured as part of the initial Sitecore-to-Solr setup.
See, for instance, How to Integrate Apache Solr with Sitecore 10.3 using the SearchStax Cloud Connector for Sitecore.
Contents:
Install the Zookeeper Script
Apache ZooKeeper is a centralized service for maintaining configuration information. In a SearchStax Cloud deployment, Zookeeper acts as a centralized repository for your Solr configuration files.
SearchStax users do not have direct access to the Zookeeper configsets as they would in a local Solr installation. Instead, they interact with Zookeeper through a modified version of Solr’s standard zkcli script. SearchStax provides both Linux and Windows versions of the script.
You can download the zkcli ZIP file here: searchstax-client-master.zip.
zkcli requires Java
To run zkcli, you will need Java. See What if zkcli returns an error? for more information.
Unzip the file. The top-level directory is \searchstax-client-master. Navigate to the solr-5, solr-6, solr-7, or solr-8 scripts subdirectory (such as \searchstax-client-master\solr-8\scripts). Locate zkcli.bat in that directory. This is the Windows version of the script.

Learn about zkcli
The zkcli script is an all-purpose toolkit for managing Zookeeper on a cloud deployment. See What else can I do with the zkcli script?
Zookeeper Best Practice
For truly secure Zookeeper management, use the SearchStax Zookeeper API. The API’s Zookeeper methods require SearchStax user authentication, and they record entries in the SearchStax Cloud access logs. See How can I secure Zookeeper? for more information.
Upload the Sitecore Configuration Files
We assume that you have a directory of configuration files prepared for your custom Sitecore collection. If not, you can download a Sitecore configset from your Solr Cloud deployment and then upload it again under a new name. The configset name should match the name of your custom index.
See How can I update my Solr configurations in Zookeeper? for instructions on using zkcli to download/upload configsets.
Follow these steps to upload the Solr configuration for your new collection:
- Download any of the existing Sitecore configsets.
- Upload the configset to Zookeeper under a new name that matches your custom index.
Create Sitecore Collections
Pay attention to ReplicationFactor
Use replicationFactor=1 for a single-node deployment. A two-node cluster should have replicationFactor=2. You need the same number of replicas as Solr servers.
When you have uploaded the Solr configuration to Zookeeper, you can create Sitecore collections by following these steps:
- Navigate to the Collections page in the Solr Dashboard.
- Click Add Collection.
- In the config set field, click the Sitecore configuration.
- Specify the following fields as shown:
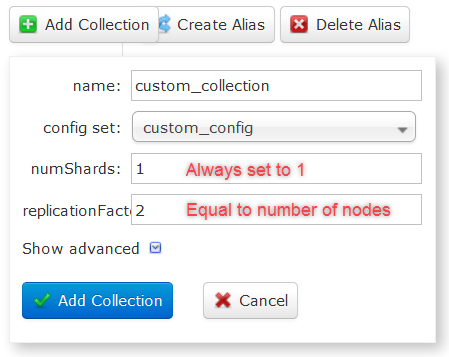
- Repeat for each of the custom collections you wish to add.
Questions?
Do not hesitate to contact the SearchStax Support Desk.